Novice photographers are often heard to say, ” it’s a great photo; pity I cut the tail off!”. We’ve all been there, and regretted the loss of an amazing photo due to missing body parts. But not all photos of animals should be exactly that…a photo of an animal in its entirety. In fact, simply filling the frame with an animal tends to risk creating an ID shot, perfect for inclusion in a field guide but not showing much artistic skill or intent.
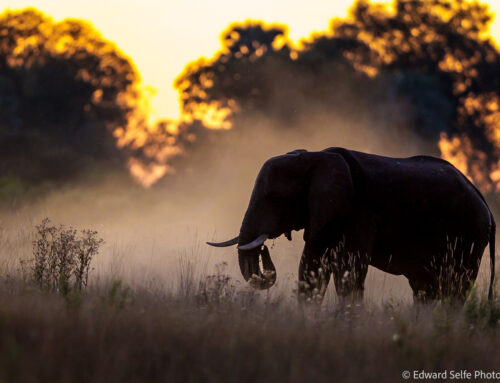
Generally I try to include landscape and environment in my images of wildlife, to show where they live and how they interact with their surroundings. But there are times when it’s appropriate to shoot tighter and include only the whole animal or even just part of it. Such occasions might occur (1) when we wish to showcase an interesting behaviour and we might zoom in close to exclude all the environment or (2) if we seek to create a portrait of that animal. We might also crop close to remove the background if it is not photogenic but I won’t address that in this article.
For the purposes of this article, I am going to assume that we are not constrained by the camera and lens technologies that we are using, and can zoom in or out to frame exactly how we would chose to.
- Behaviour
Animal behaviour is the first prize for nature photographers. Many of us will lament a beautiful lion sighting because they aren’t “doing much”! The chance to capture action and interaction excites wildlife photographers as it brings energy, life and intensity to images. This is why we wait hours for the chance to photograph hunting, mating, playing, feeding, chasing, nursing and birthing. In these scenarios, I often choose to frame closer to make sure that the behaviour is foremost on the eye of the viewer.
Take the image of a hyaena below; it was carrying the tail of an elephant which it had stolen from a lion kill. I wanted to capture this remarkable moment and leave my viewer in no doubt as to what they are seeing. In this case, additional space around the subject would not have added to the story.

But, for the sake of this discussion, could I have shot closer including even less of the background…? Perhaps even cutting off some of the hyaena’s body? I think I could have done so, but only by switching the camera vertically. The reason for this is that it’s essential to include all the of the elephant’s tail to keep the story and shooting closer horizontally would have cut off the bottom. See below a proposed vertical crop.

In this image of bull hippos fighting in Busanga Plains, I chose to crop in closer to increase the size and ‘weight’ of the drooling saliva and open jaws, even thought it meant cutting off more of the bulls’ bodies. Because we see roughly the same amount of each hippo, the image is balanced, and cropping has the additional bonus of removing some of the bright distracting sky.

Below is the original image where the intensity of the action and behaviour is far less evident.

A similar situation occurs here, where two young elephants are cavorting in the water. By cropping in a bit closer, we focus that attention of the viewer on to the play session. It’s acceptable to cut off parts of the adult elephants, especially the one on the left who is facing away. Here is the original image:

And below is the cropped image, where the young elephants are front and centre of the frame:

Perhaps my best action shot to date; the moment when a leopard explodes from cover to catch a baboon that was resting in the early morning sunshine. We were very fortunate that this incredible encounter occurred out in the open where there were almost no distracting elements. This meant that the image does not need to be cropped closely and the intensity of the moment is immediately clear.

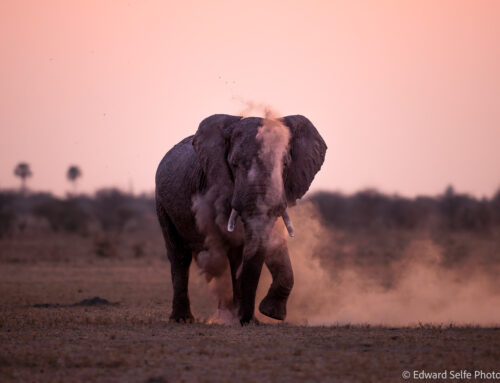
Elephants love to mud-bath. I wanted to capture the spray of thick liquid mud as the elephants churned it up with their feet. Photographing the mud was no problem: choose a high shutter speed and take a burst of shots as the elephant kicked its leg. The hard part was finding a frame where the composition of the overall shot was pleasing; beyond the mud spray, it’s important that the viewer knows what they are looking at — where is the mud coming from and why is it in a spray? Therefore the legs and/or trunk of the elephant should be showing to assist with understanding the story. Initially, I chose a closer vertical framing where the elephant’s leg, trunk and tusk were showing…..

…but I subsequently reverted to a wider frame where the elephant’s other front leg is showing and where more of the spray of mud is included. It’s a pity that I was not a fraction of a second earlier with my shot as I could have caught the ‘front edge’ of the spray before it leaves the right hand edge of the image.

.
2. Portraits
There are also times when we want to create a portrait of an animal, either to show off its beauty or because there is very special light hitting it. In these situations, it works well to remove as much of the background as possible, to bring the viewer as close as possible to the subject and allow them to admire the details of the subject.
If you don’t want to show the whole animal, there are, as with human portraits, ‘sensible’ cut-off points where you can exclude parts of the subject without it creating an awkward composition. For example, you might shoot a portrait of a standing human where you cut them off at the thighs and show everything above….but it would be strange to cut someone off at the ankles… Similarly, you might cut off a lioness at the flank, showing her shoulders and head, but you would probably not cut her off half-way along her tail.
A few examples of how this works in practice are shown below.
The light hitting this zebra stallion from the side glints in his eye and creates a strong, striking portrait. Combined with the dark background, the subject pops out and is the primary focus of your attention. I chose to crop this close, including just the head and neck, leaving space for the mane, ears and neck but cutting off anything additional. Leaving some of the chest in the frame shows where the neck originates, but doesn’t pull the eye away from the zebra’s face.

This is one of my favourite lion photos. The interaction between the two lionesses is beautiful and the light hits them at the perfect angle, giving them shape but not casting any dark shadows. I chose to crop this close, removing all distractions. Going vertical allows me to include their legs and a dark stripe of grass at the base of the frame which forms a ‘base’.

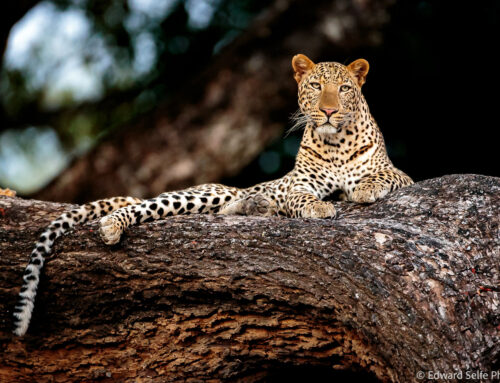
I chose to include this image in the article because it shows neatly how you can use the environment to help with composition. This image captures a young leopard snoozing in a tree. There is a lot of bright light coming through from behind the subject so I wanted to crop in close to reduce this as much as possible. The vertical tree trunk on the right hand side of the frame offers me the chance to cut the image at that point and not have the edge of the frame running across the body of the leopard.

When shooting portraits of head and shoulders, I like to cut off the animal at the torso. This feels like a natural point at which to frame, showing where the head and neck ‘originate’ but not giving too much ‘weight’ to the body which distracts from the head and face. Here are a few examples:

.

.

The image below is a good example of how the balance of an photo can be thrown out by 1 moving element. In this case the cub’s tail. As the two cubs approach the camera, they rub heads with their mother watching from behind. It’s a great moment. But when the cub raises its tail, it forced me to shoot wider, and therefore include more of the mother’s body. I want to crop in more but I can’t cut off that tail, so the image loses much of its impact.

In this final scenario, I am offering two images, differently cropped in a subtle way. I wonder if you prefer one or the other, and why..?

.

And one, just for fun!