This is the first in a series that will discuss different techniques to add impact to wildlife images. The world is flooded with images of animals and it’s increasingly hard to make yours stand out. But whether you are hoping to sell your images, or just to take increased pleasure in the process of creating something that has immediate impact, there are several ways of achieving it.
In this first blog, I am looking at the use of differential light and how that can be used to create striking images where the subject has immediate impact and keeps your interest.
When I use the phrase ‘differential light’ I refer to situations where there is variation in the brightness of the different parts of the frame. This will usually occur when some parts of the image are in sunlight and others in shade, or where one part is much paler than another. Take the following image of impalas standing on the edge of a pan, with mature trees towering over them. The antelope are brightly lit, as are the leaves of the trees, but the earth bank and the vegetation behind are in shade.
Including this mixed lighting in the frame add interest to the image and ensures that the impalas are the first detail the viewer notices in the frame. This is usually achieved by shooting with the sun to the side of the camera (side lighting), overhead or in front of the camera (back lighting).

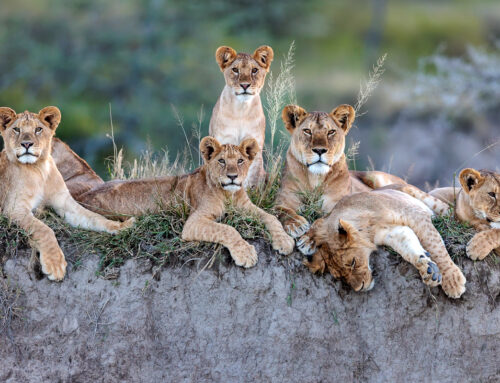
For further explanation, below is an image where there is no mixed or differential lighting in the scene. The sun is behind the camera, casting equal light across the whole scene. The lions, the grass, the ground and the shrubs are all lit with the same colour and intensity of light. While the action and the subjects are beautiful and interesting, the resulting image is flat and the lions do not ‘jump out of the frame’ at the viewer.
Avoiding this kind of flat lighting is a priority for nature photographers who want to show their subjects in their surroundings, but ensure that the subjects are still the first detail that the viewer sees.

In the case of the impalas above, the differential lighting across the frame was such that they were the brightest part of the image. This is usually a good technique as our eyes are usually drawn to bright elements first. And indeed, this is a style that I have used many times to bring out my subject and make sure that it generates great impact in the frame. Below are a few examples, beginning with an image of a leopard climbing a tree.
We waited a long time to create this shot! The leopard had a kill in the high branches of the tree, so we knew that she would return to it at some point. As the sun rose, I continually moved the vehicle closer to the tree to keep the dark shadow cast by the tree behind the trunk. That way, when the leopard climbed, she would be lit by the sun, but the grass behind her would be in shade – this ensured that the bright green/yellow textures of the grass did not compete for attention with the leopard’s spotty coat.

Chimps offer another example where using differential light helps to create special images. In this case, a large male chimp had climbed into a low tree and was resting in the middle of the day. He had chosen a tree in the shade, but there was dappled light coming through the canopy. I waited hoping that the movement of the sun overhead would, at some point, lead to a spot of light hitting his face. I was lucky as the filtered light not only hit his face, but also caused him to open his eyes. The rest of him was in shade meaning that his dark coat offsets the brightness of his face.

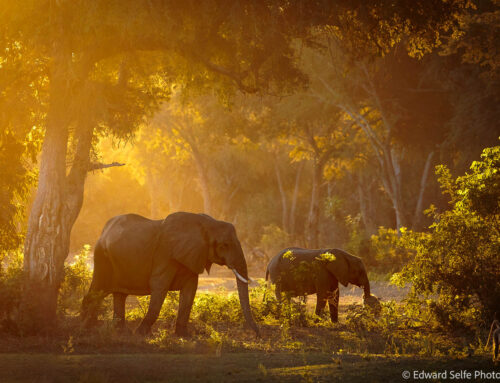
I most commonly use differential light when I am photographing animals on the move. We followed these two leopard siblings as they played and explored their surroundings. By waiting until they emerged from a shady patch, and shooting before they moved into the next one, I was able to show them side lit, against darker surroundings. This does not totally remove their environment (which is not the intention) but makes sure it does not compete for attention. Of all the ways to create differential light in an image, this is the one that I most often have the opportunity to use.
The second image below also makes use of the shadow that is created by a deep drainage gulley. Taking images of the leopard in the gully helps to show the ways that she hunts for prey, but waiting until she passes through a patch of light retains this behavioural image while making sure that she is immediately obvious to the viewer.

.

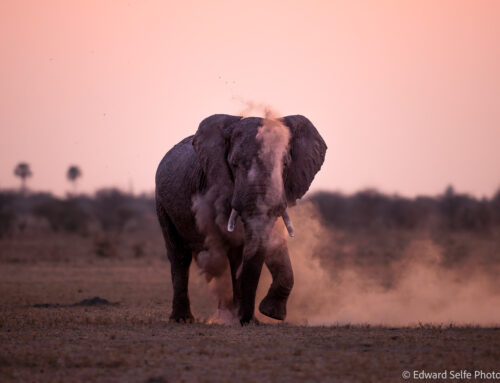
But it is not only possible to use differential light to make your image the brightest part of the frame. Assessing the environment and watching for suitable locations, we can also make high impact images when the subject is darker than the surroundings. Take this image of an elephant in Botswana which was dust bathing at sunset. By shooting towards the light, we placed the elephant against a dark background while retaining the colour in the sky. When he started to throw dust on himself, it completed the image as the dust was lit by the sun and helped to separate the elephant from the dark vegetation beyond.

Similarly with this elephant from South Luangwa in Zambia — the subject that we are showcasing is the elephant and the dust that he’s tossing with his trunk. But they are in fact the darkest part of the scene and therefore stand out almost as a silhouette. Had we moved around 180′ to the other side of him, the colour of the light would have been the same but the subject and background would have been evenly lit and the dust would not have been distinct from the landscape behind.

There are also times when the light is hitting a scene evenly but there are lighter and darker parts of the frame. Take this image of a lioness on the rocky kopjes of the Serengeti. She was evenly lit by the sun, which was behind me. But there was a darker side to one of the large rocks so I was able to move the vehicle to place that behind her head and torso to ensure that, even though the light was equal across the frame, her face was outlined brightly against the background.

Technique
There are many ways to play with differential light to create high-impact images. Generally, these scenes require instructing the camera to override its metering default and make the image lighter or darker than the camera’s natural exposure. The extent to which this ‘exposure compensation’ is required is determined by the balance of light and dark areas of the frame, and which part of the frame you want to expose correctly.
In many of the images above, the significant dark areas in the frame would lead the camera to return an image that is too bright, so I chose to underexpose in the camera. This will be done with the +/- button which can be found on nearly all cameras from bridge models through to top-spec mirrorless systems.
Take a look at the balance of light and dark in the images below and notice how the light falling on the scene helps to bring out the subjects.

.

.

Thank you for reading; please leave any comments or questions in the section below.